AEP Netilla is a secure and widely used SSL VPN that gives easy and affordable remote access to the enterprise. It gives efficient hardware maintenance processes, lesser power consumption for data centers, and enhanced business continuity benefits in server virtualization deployments.
In this article, we will go through the process of
- Creating a certificate signing request (CSR) in AEP Netilla
- SSL Installation in AEP Netilla
1. CSR Generation:
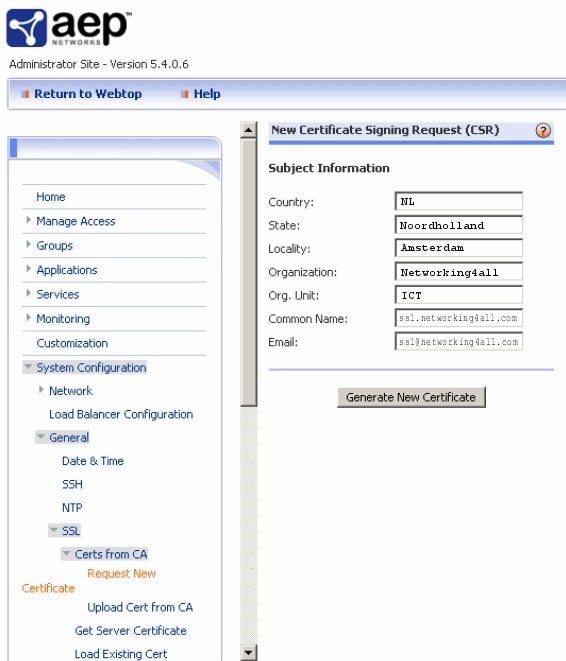
- Open your Netilla Admin panel and go to System Configuration, General, SSL, and then choose “Request New Certificate.”
- You will get a form to enter your company’s information which will be submitted to DigiCert as part of your certificate request.
- Most of the requested information should be straightforward, but remember that your country should be your 2-digit country code, not the entire country name. Your common name is the fully-qualified domain name your certificate will be issued to, or *.domain.com for wildcard certificate requests.
- You will now have an encoded text file. This is your CSR, or certificate signing request. You will copy and paste the entire body of this file into the form provided by DigiCert for requesting your certificate.Once you have submitted your CSR to DigiCert, you will need to wait until you have received your certificate filed back (by email or download inside your account) to continue with the certificate installation.
2.SSL Installation:
- Login to Netilla
- Open the Netilla Administrator.
- Go to System Configuration > General > SSL > CA Certificates > Upload New.
- /ROOTS|Get your intermediate certificate. Copy and paste the contents in the Upload New CA Certificate window.
- Click Submit.
- Go to Netilla Administrator.
- Go to System Configuration > General > SSL > CA Certificates > Upload Cert from CA.
- Paste the entire content of your SSL certificate (from step 1) in the Certificate window.
- Click Submit.
Verify by browsing your website. If not updated, please try restarting your services.
If you are unable to use these instructions for your server, Acmetek recommends that you contact either the vendor of your software or the organization that supports it.
If this article is helpful, please share it.
