The Digicert Certificate Utility for Windows allows for the ability for admins to create the .pfx file needed for Azure systems without the need for a Windows Server.
This guide will carry you through the following:
- CSR generation
- SSL installation
- Export of installed certificate as a pfx
- Import pfx into Azure
These instructions assume that you already own your Windows Azure website, and that you have configured the domain name for your website. For more information, visit Microsoft’s Windows Azure page, or contact Microsoft.
Key features of the Digicert Certificate Utility that can help with the SSL Management are..
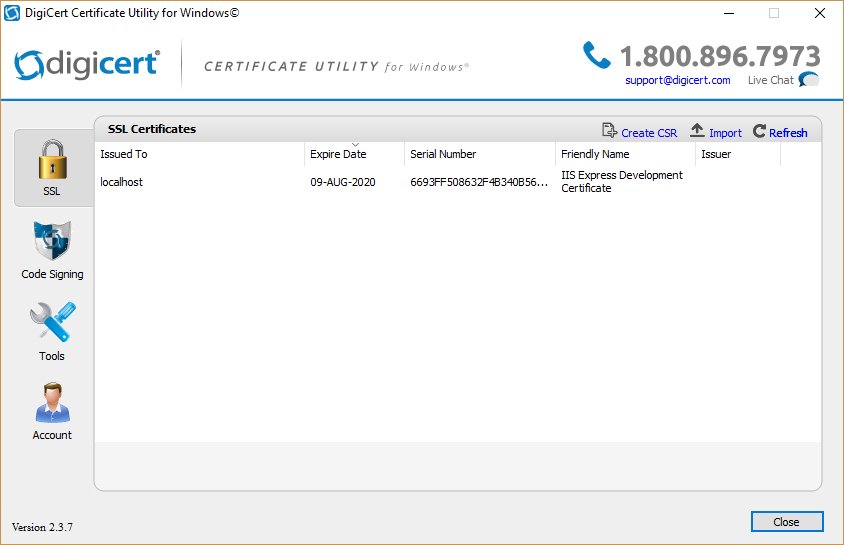
- Generate a CSR for your SSL Certificate renewal or new order
- Install certificates to pending requests
- Re-install certificates in one click
- Copy certificates between servers
- Convert certificate into various formats
Things to know:
- If you use the utility to generate a CSR for an SSL Certificate then once the certificate is issued you will have to import your SSL Certificate using the utility to successfully configure your SSL certificate to create a pfx file.
- The Digicert Certificate Utility for SSL Certificates Automatically refers to the Windows account certificate stores on the Windows system.
- After installation you can export the certificate in an Apache .pem, .crt-.key format or a Windows pkcs12 .pfx format. Appling the certificate to what ever systems require it.
Downloading and Installing The Digicert Certificate Utility.
- On your Windows server or workstation, download and save the Digicert Certificate Utility for Windows executable (DigiCertUtil.exe).
- Run the Digicert Certificate Utility for Windows by Double-click DigiCertUtil.
Congrats you have downloaded and installed the Digicert Certificate Utility.
Step 1: How To Generate a CSR From The Digicert Certificate Utility:
To generate a CSR to get an SSL Certificate perform the following.
- Run the Digicert Certificate Utility by Double-clicking the DigicertUtil.exe.
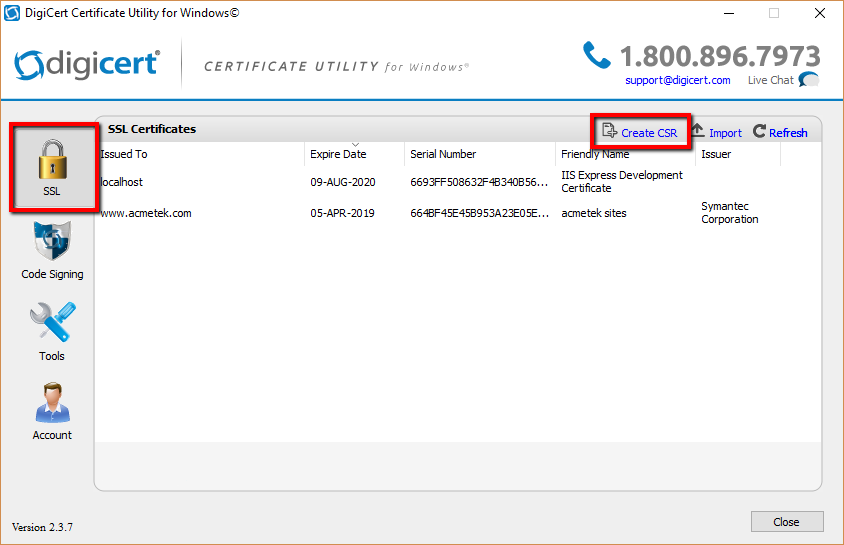
- In the Digicert Certificate Utility, Click SSL.
- Click Create CSR.
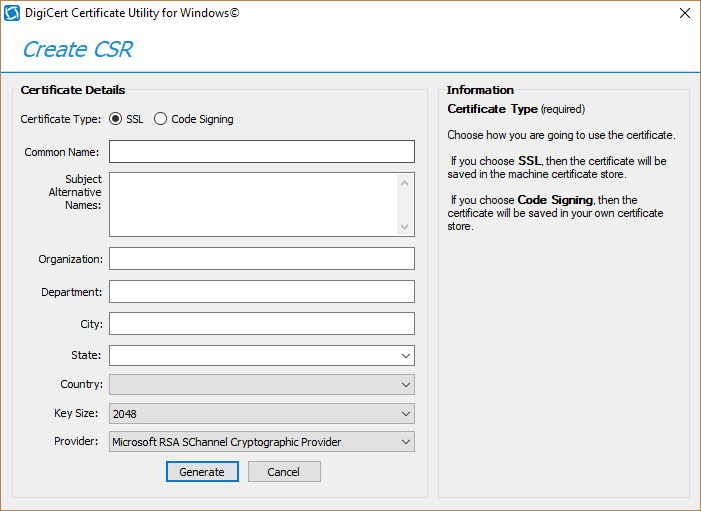
- In the Create CSR window under Certificate Type: select SSL.
- In the Certificate Details fill out the following fields:
- Common Name: The Fully Qualified Domain Name that the certificate will be issued to and secure. for example www.yourdomain.com or if you are enrolling for a wildcard certficaite *.yourdomain.com
- Organization: Repeat the legal name of your organization again.
- Department (optional): Enter the sub team or organizational unit that this SSL Certificate pertains to. Examples: Marketing, Mobile gaming, SSL Support Desk, IT, Etc..
- City: Legal corporate headquarters. Example Boston.
- State: Enter the state or province where your legal corporate headquarters is located.
Note: The state your organization is located in or if you’re creating a CSR for a location outside of the USA, you can enter anything into the list. It will accept any state name you type. - Country: From the drop down menu select the county.
- Keysize: Any will do. (Leave at default).
- Provider: Leave at default.
- When all the information has been filled click Generate.
- You will get another window that will display your CSR request. Copy the text, including the —–BEGIN NEW CERTIFICATE REQUEST—– and —–END NEW CERTIFICATE REQUEST—– tags, and paste it into the your CA order form.
- When you are done, click Close.
Congrats you have just created you have just generate your CSR. During the enrollment of your SSL Certificate the CA should provide you with a field to paste this CSR into.
Note: Depending on the CA when enrolling they may ask you for a Server or Format type you would like for your certificate. Select either Microsoft/Windows or pkcs7. This will ensure you receive your certificate and all its required intermediates in one file, and will make installation back into the Digicert Utility easier.
After the SSL Certificate gets issued you will then Import your SSL Certificate back into the utility.
Step 2: Installing Your New SSL Certificate Into The Digicert Certificate Utility:
After you have enrolled for your SSL Certificate using a CSR generated from the utility you will then have to Import/Install the SSL Certificate after it gets issued. The CA should give you a pkxs7 format certificate also known as a .p7b. The way they give you this certificate will vary.
Save and move this .p7b file to the system where you have created the CSR using the Utility on.
To complete and install your SSL Certificate perform the following.
- Run the Digicert Certificate Utility by Double-clicking the DigicertUtil.exe.
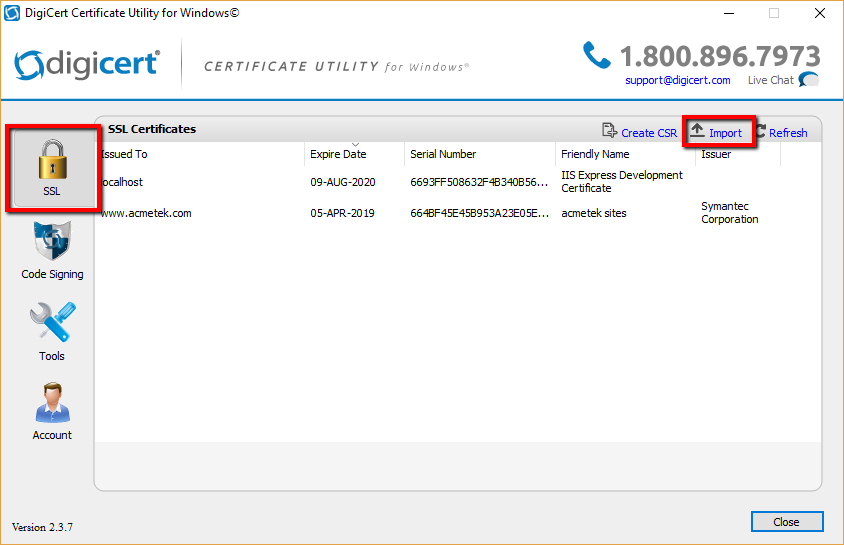
- In the Digicert Certificate Utility, Click SSL.
- Click Import.
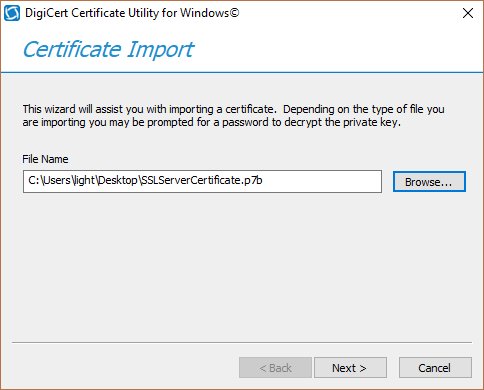
- In the Certificate Import window click Browse.. and Open to specify the location and path of your SSL Certificate. Change the file type to either PKCS#7 Certificates (*.p7b) or All from the drop down to find your certificate.
- After specifying the location and path of the file click Next.
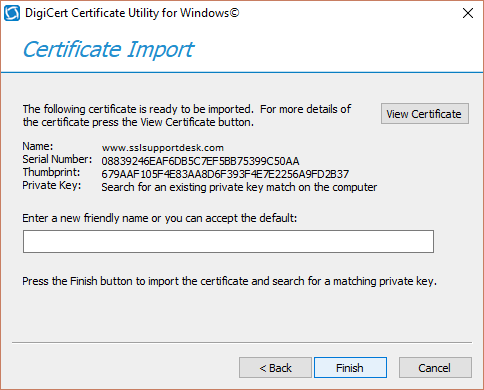
- You will see information about the certificate you have selected to import. In the Enter a new friendly name or you can accept the default field type a friendly name for the certificate. Something unique so that you can quickly identify this certificate.
- Click Finish.
- You should get confirmation that the certificate has been successfully install and see it within your list of code signing certificates.
Note: If you get an error that states “Private Key Missing” this is due to the following causes…- You did not create the CSR/Private key on this machine:
Resolutions:- Make sure you are on the correct system that has the Digicert Certificate Utility installed where you generated the CSR from.
- If you lost your private key or if the system where the CSR was generated using the Utility blew up then you will have to start from scratch by generating a new CSR, and performing a reissue/rekey of your SSL Certificate.
- You are installing the a wrong certificate:
Resolutions:- Make sure you are installing the correct certificate. Typically once the certificate is on your desktop as a .p7b file you can double click on it to read the information. make sure the certificate or one of the certificates in its chain is issued to your organization with the correct dates.
- You did not create the CSR/Private key on this machine:
Congrats you have just installed your SSL Certificate using the Digicert Certificate Utility for SSL.
Step 3: Exporting Your SSL Certificate As a pfx From The Digicert Certificate Utility.
- Run the Digicert Certificate Utility by Double-clicking the DigicertUtil.exe.
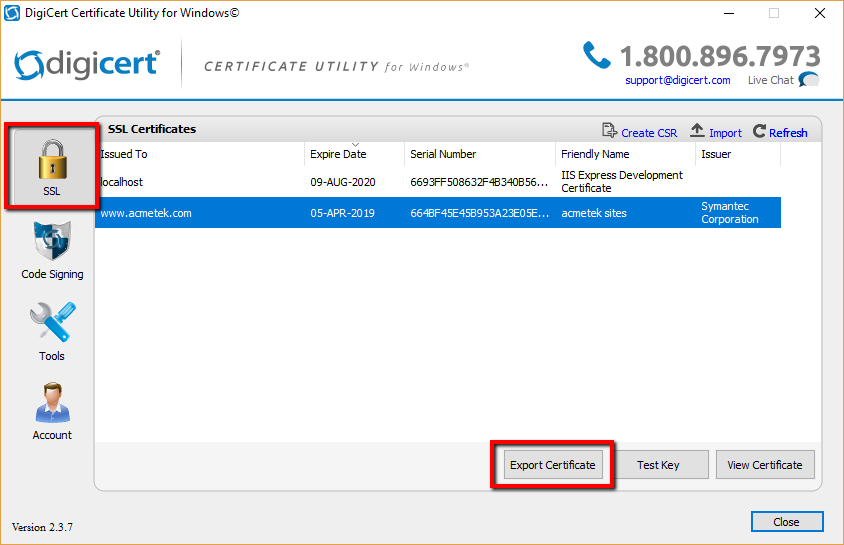
- In the Digicert Certificate Utility, Click SSL.
- Select the SSL Certificate that you want to export and then click Export Certificate.
- In the Certificate Export wizard, select Yes, export the private key.
- Select pfx file.
- Check Include all certificates in the certification path if possible.
- Click Next.
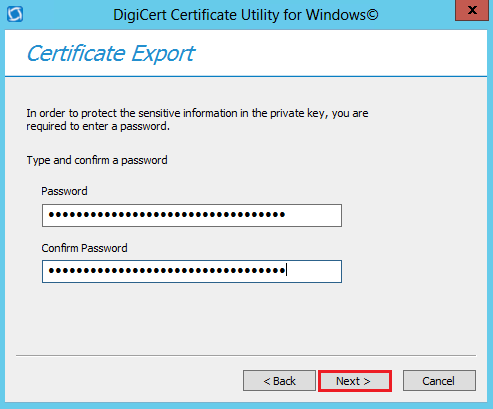
- In the Password and Confirm Password fields enter and confirm a password you can remember.
Note: This password is required when you install or import your SSL Certificate into any other system. Do not forget it. If you do then you will have to repeat the export of the certificate and create a new password. - Click Next.
- Next to the File Name field click the … to browse to a location and path you want to save your .pfx file. Give it a name of your choice, click Save and then Finish when done.
- You will receive a message stating that the export was successful, click OK.
Congrats you have exported your SSL Certificate as a pfx, and are now able to distribute/apply it.
Step 4: Importing And Assigning Your pfx Into Azure:
- Log into the Azure Management Portal.
- Click on Cloud Service or Web App you wish to configure and then select the CONFIGURE tab.
- Under certificates click upload a certificate.
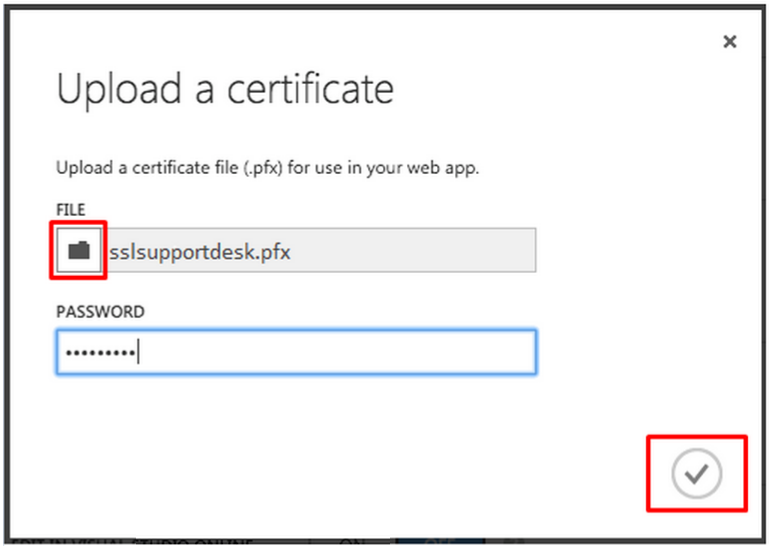
- On the Upload a certificate window click
and browse to your pfx file that you had saved in Step 2.
- Specify the password for the pfx file you had created.
- Click on the
to confirm.
After Upload your SSL certificate will be available under the “Certificates” section. - Under ssl bindings, In the Choose a domain name drop-down list, specify the domain that you want to secure with SSL.
- In the Choose a certificate drop-down list, select the new SSL Certificate that you want to use to secure your website.
- Select whether to use Server Name Indication (SNI) or IP based SSL.
- IP based SSL: associates a certificate with a domain name by mapping the dedicated public IP address of the server to the domain name. This requires each domain name (domain.com, www.mysite.com, etc.) associated with your service to have a dedicated IP address. This is the traditional method of associating SSL certificates with a web server.
- SNI based SSL: is an extension to SSL and Transport Layer Security (TLS) that allows multiple domains to share the same IP address, with separate security certificates for each domain. Most modern browsers (including Internet Explorer, Chrome, Firefox and Opera) support SNI, however older browsers may not support SNI. For more information on SNI, see the Server Name Indication article on Wikipedia.
- Click Save to save the changes and enable SSL. Your SSL certificate is now installed and configured for its website.
If you are unable to use these instructions for your server, Acmetek recommends that you contact either the vendor of your software or an organization that supports Microsoft.
Microsoft Support:
For more information refer to Microsoft Azure.
