 Like the majority of server systems you will install your SSL certificate on the same server where your Certificate Signing Request (CSR) was created. This is because your private key will always be left on the server system where the CSR was originally created. With Microsoft systems the private key is hidden away and will only appear once the CSR request has been completed. Your SSL certificate will not work without this private key file. We will assume that this is the original system.
To Install your SSL certificate on Windows Server 2012 – IIS 8 & 8.5 perform the following.
Step 1: Picking up your SSL Certificate:
- If you had the option of server type during enrollment and selected IIS you will receive a pkcs#7/.p7b version of your certificate within the email. Alternately you can access your Certificate User Portal by the supplied link in the email to pick up the pkcs#7 version of your certificate.
- Copy the SSL certificate and make sure to copy the —–BEGIN CERTIFICATE—– and —–END CERTIFICATE—– header and footer Ensure there are no white spaces, extra line breaks or additional characters. Use a plain text editor such as Notepad, paste the content of the certificate and save it with extension .p7b (When performing this on a Windows system the Icon of the file should change into a certificate icon)
Step 2: Installing your SSL certificate:
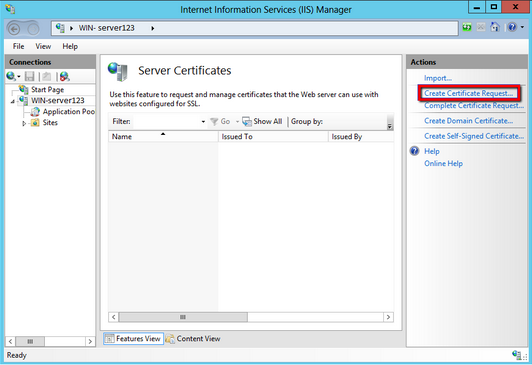
- Go to Start > Administrative Tools > Internet Information Services (IIS) Manager.
- From the left menu, Click the server name.
- In the middle pane, under Security, double-click Server Certificates.

- From the right Actions pane, select Complete Certificate Request.

- Click on the
 button, navigate and select the location of your new certificate file. (change the file type you are searching for to all .p7b as the default type may be .cer)
 - Specify a friendly name for quick identification of your new certificate.
- In the Select a certificate store.. make sure that Personal is selected from the drop down.

Note: You may receive an error when the system is performing the install. This is typically with a glitch with the IIS 7 to IIS 8 series.- Click Ok to acknowledge the error message, and Cancel out of the Complete Certificate Request Wizard.
- Hit F5 on your keyboard to refresh the IIS console. Your new certificate should appear in the Middle pane under Server Certificates. It might be missing a friendly name. If you see the new certificate in this pane it means that installation was successful.
Note: If your certificate still does not appears then either the CSR request was never created on this system, or your private key was damaged. You will have to generate a new CSR request and perform a reissue of the certificate.
Step 3: Assign and Bind the SSL certificate to your web site:
- Browse to your server name > Sites > Your SSL-based site.
- In the Actions pane, click Bindings.

- In the Site Bindings window. If there is no existing https binding, choose Add and change Type from HTTP to HTTPS.
Note: If there is already a https binding, select it and click Edit.
- From the SSL Certificate drop down, Select the Friendly Name for the SSL certificate that will be used for this site.

- Click Ok.
Your SSL Certificate is now installed, and the website is now configured.
Additional Notes:
- If you do not specify an IP address when installing your SSL Certificate, the same ID will be used for all virtual servers created on the system.
- If you are hosting multiple sites on a single server, you can specify that the ID only be used for a particular server IP address.
- If you get this warning message:

Visit our troubleshooting article for possible resolutions: Troubleshooting: At least one other site is using Https binding and the binding is configured with a different certificate. - Typically IIS will automatically propagate your assigned SSL Certificate to the website check to see if your SSL Certificate is being propagated by the following SSL Certificate Checker http://cryptoreport.websecurity.symantec.com/checker/. If you see your newly Assigned SSL Certificate you are in the clear. If not then perform the following:
- Start and stop the website.
- Restart The Server.
- If you have performed both 1 & 2 of the above and still do not see the new assigned certificate, then you may have a loadbalancer or Firewall acting as man in the middle that may need to be configured. Some loadbalancers or firewalls may need the SSL certificate installed on that system as well. For a list of how to move export/import instructions see our category Backup/Export (how to move) an SSL certificate.
If you are unable to use these instructions for your server, Acmetek recommends that you contact either the vendor of your software or an organization that supports it.
Microsoft Support
For more information refer to Microsoft.