 Depending on the circumstance you may need to export your SSL Certificate to wherever else it is needed. The Digicert Certificate Utility allows you to export an SSL Certificate with its private key that has been generated from it from the following formats pfx or pem.
This comes in handly with large typologies where not all server systems, firewalls, applications, etc.. handle Certificate keypair encryption the same way.
So in a situation where you need to have you SSL Certificate Installed on both a Windows or an Apache system you can export the certificate off the Utility in either compatible format.
Below are instructions on how to export your SSL Certificate Installed in the Digicert Certificate Utility in either pfx or pem format.
Note: We are assuming that you have already used the Digicert Certificate Utility for CSR creation and Installation. The below export instructions will only work on a Windows system from either of the following.
- The certificate utility was used for both CSR generation – Installation.
- This is a Windows server system that already has an SSL certificate installed.
Visit our article Digicert Certificate Utility – CSR Generation & SSL Installation if you need to still need to configure a public/private keypair and ready it for export/conversion in what ever format you require.
Downloading and Installing The Digicert Certificate Utility.
- On your Windows server or workstation, download and save the Digicert Certificate Utility for Windows executable (DigiCertUtil.exe).
- Run the Digicert Certificate Utility for Windows by Double-click DigiCertUtil.
Congrats you have downloaded and installed the Digicert Certificate Utility.
Exporting your SSL Certificate from the Digicert Certificate Utility as a .pfx:
- Run the Digicert Certificate Utility by Double-clicking the DigicertUtil.exe.
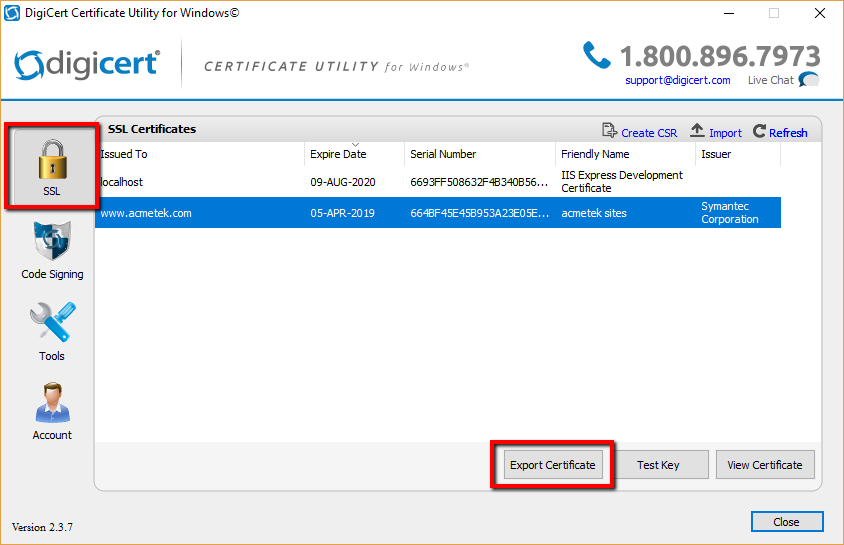
- In the Digicert Certificate Utility, Click SSL.
- Select the SSL Certificate that you want to export and then click Export Certificate.

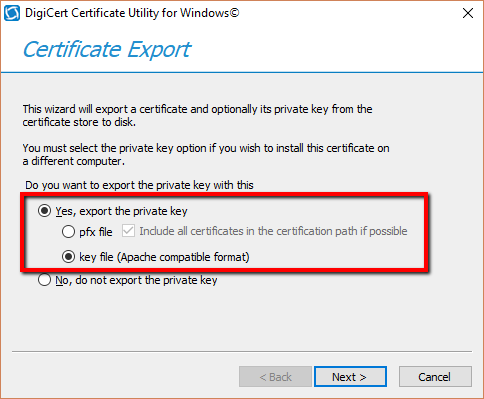
- In the Certificate Export wizard, select Yes, export the private key.
- Select pfx file.
- Check Include all certificates in the certification path if possible.
- Click Next.

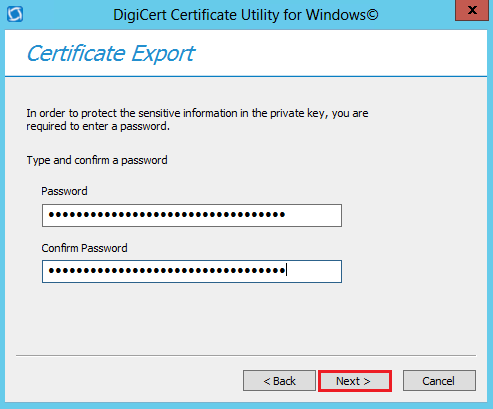
- In the Password and Confirm Password fields enter and confirm a password you can remember.
Note: This password is required when you install or import your SSL Certificate into any other system. Do not forget it. If you do then you will have to repeat the export of the certificate and create a new password. - Click Next.

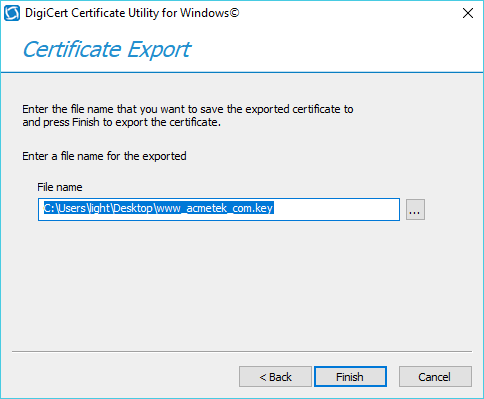
- Next to the File Name field click the … to browse to a location and path you want to save your .pfx file. Give it a name of your choice, click Save and then Finish when done.
- You will receive a message stating that the export was successful, click OK.
Congrats you have exported your SSL Certificate as a pfx, and are now able to distribute/apply it.
For a list of Installation instructions check out our SSL Installation articles.
Exporting your SSL Certificate from the Digicert Certificate Utility in Apache pem/x509/.key compatible format:
Depending on the circumstance you may need to move install, etc.. your certificate and its private key into an Apache type system. The Digicert Utility has the capability of exporting an installed SSL certificate in the an Apache format.
- Run the Digicert Certificate Utility by Double-clicking the DigicertUtil.exe.
- In the Digicert Certificate Utility, Click SSL.
- Select the SSL Certificate that you want to export and then click Export Certificate.

- In the Certificate Export wizard, select Yes, export the private key.
- Select Key file (Apache compatible format).
- Click Next.

- By default the exported file will be saved to your desktop. otherwise click the … and specify the file name and path you would like to save your file.
- Click Finish.

- You will see at least two files put into the location, name and path you specified to save your exported Apache compatible files.
- name.key: This is your private key file.
- name.crt: This is your SSL Certificate.
- CACert.crt: Any CA intermediate chain trust certificates that went along with your SSL Certificate during its export is put into this file.
- Congrats you know have pem x509 apache format certificates. With your two – three files you can re-name the or change the extensions of the files as you see fit. Opening the files in notepad will give you a copy paste method to import the certificate into hosting environments or other applicable systems. If you have a system that needs pem simply change the .crt extension of the files by renaming them to .pem. Typically you will leave you.key file as if.
Congrats you have exported your SSL Certificate in pem/x509 format and is ready for you to distribute.
For a list of Installation instructions check out our SSL Installation articles.