S/MIME
Advantages of S/MIME Certificates
S/MIME (Secure/Multipurpose Internet Mail Extensions) certificates offer several advantages when it comes to securing email communications. Here are some key advantages of using S/MIME certificates:
1. Message Encryption: S/MIME certificates provide end-to-end encryption for email messages. They use public key cryptography to encrypt the content of the email, ensuring that only the intended recipient can decrypt and read the message. This helps protect the confidentiality of sensitive information transmitted via email.
2. Message Integrity: S/MIME certificates also enable message integrity verification. They use digital signatures to sign the email content, which allows the recipient to verify that the message hasn’t been tampered with during transit. If any modifications are made to the email, the signature verification will fail, alerting the recipient to potential tampering attempts.
3. Authentication: S/MIME certificates provide a means of authenticating the sender’s identity. The certificate is issued by a trusted certificate authority (CA), which verifies the identity of the certificate holder. When a recipient receives a S/MIME-signed email, they can verify the sender’s identity by validating the digital signature against the public key contained in the certificate. This helps prevent impersonation and spoofing attacks.
4. Trust and Reputation: S/MIME certificates are issued by trusted CAs, which establishes trust and enhances the sender’s reputation. When recipients see that an email is digitally signed using a S/MIME certificate, they can have confidence in the authenticity and integrity of the message. This can be particularly important in business or professional settings where trust and credibility are crucial.
5. Compliance: S/MIME certificates can assist with regulatory compliance requirements. Some industries, such as healthcare and finance, have specific regulations regarding the protection of sensitive data. By using S/MIME certificates, organizations can demonstrate that they have implemented secure email communication practices, which can help meet compliance obligations.
6. Compatibility: S/MIME is a widely supported standard for email security. Most popular email clients, such as Microsoft Outlook, Apple Mail, and Thunderbird, support S/MIME encryption and digital signatures. This ensures that recipients using different email clients can still benefit from the security features provided by S/MIME certificates.
Overall, S/MIME certificates offer a robust solution for securing email communications by providing encryption, message integrity, authentication, and trust. They are widely supported and can help organizations meet security and compliance requirements while ensuring the privacy and confidentiality of their email correspondence.
Contents
Exercise 1. Configure a S/MIME certificate profile. 3
Task: Configure the certificate profile. 4
Task: Enroll and invite users to acquire their certificate. 7
Task: Pick up the certificate and install it 9
Exercise 2. Configure Outlook for S/MIME.. 11
Task: Configure Outlook for S/MIME.. 12
Task: Send an encrypted email 15
Overview
Some description here
Exercises in this lab:
Exercise 1. Configure a S/MIME certificate profile Exercise 2. Configure Outlook for S/MIME
Exercise 1. Configure a S/MIME certificate profile
For this exercise, you will configure a S/MIME certificate profile to authenticate and encrypt email communication over a network.
The steps that will be performed in this phase are:
Task: Configure the certificate profile
Task: Enroll and Invite users to acquire their certificate Task: Pick up the certificate and install it
Task: Configure the certificate profile
VM: User Workstation
Username: Accounts ID
Password: Accounts PW
- Log onto the User Workstation VM using the Accounts ID/ Your Password credentials
- Launch Google Chrome and navigate to: https://dcone.digicertdemo.com
- Log onto DigiCert ONE using the tlmadmin / Your Password Credentials
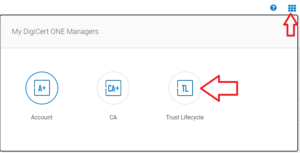
- From the 9-dot menu, select Trust Lifecycle Manager
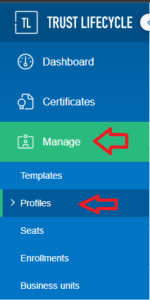
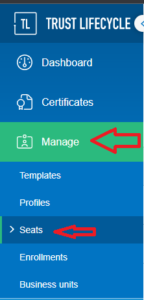
- From the Trust Lifecycle Manager menu, click Manage, then click Profiles
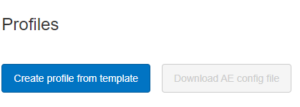
- From the Certificate profiles window, select Create profile
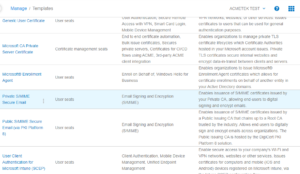
- From the Certificate templates menu, click Private S/MIME Secure Email
- From the Create certificate profile – Primary options window, provide the following:
- Profile name: S/MIME
- Business Unit: Demo Business Unit
- Issuing CA: DigiCert Demo Issuing CA
- Enrollment Method: Browser PKCS12
- Authentication Method (optional): Enrollment Code
- Change expiration: Yes (Checked)
- Validity: 10 days
- Code length (9-64 characters): 9
- Embed code in enrollment URL: No (Unchecked)
- Use fixed enrollment URL: Yes (Checked)
- Click Next
- From the Create certificate profile – Certificate options window, provide the following:
- Certificate expires in: 365 Days
- Algorithm (optional): sha256WithRSA
- Key Type (optional): RSA
- Key Size (optional): RSA 2048
- Duplicate certificate: Yes (Checked)
- Key escrow options: No Escrow – your certificate’s private key will not be escrowed/backed up
- Renewal Window (optional): 30 Days (Recommended)
- Automated renewal approval: checked
- Subject DN and SAN fields: Email, then click Add fields
- RFC822 name (email):
- Source for the field’s value: Entered/uploaded by Admin
- Required: Yes (Checked)
- Multiple: No (Unchecked)
- Email:
- Source for the field’s value: Entered/uploaded by Admin
- Required: Yes (Checked)
- Click Next
- From the Create certificate profile – Extensions window, accept the default values for Key usage (KU) and Extended key usage (EKU)
- Click Next
- From the Create certificate profile – Additional options window, accept the default values for Certificate delivery format, Administrative Contact, Email configuration and notifications, and LDAP search
- Click Next
- From the Create certificate profile – Advanced settings window, accept the default values for Seat ID Mapping and Authentication enrollment fields
- Click Create
- The Certificate profile created window will popup, click the copy icon
- Source for the field’s value: Entered/uploaded by Admin
- Minimize Chrome
- Open Notepad
- Paste the URL that you copied from DigiCert ONE
- Save the file to the desktop as smime.txt
- Close Notepad
Task: Enroll and invite users to acquire their certificate
VM: User Workstation
Username: Accounts ID
Password: Accounts PW
- Restore Chrome
- From the 9-dot menu, select Trust Lifecycle
- From the Trust Lifecycle Manager menu, click Manage, then click Seats
- Click the 3 dots next to user1@digicertdemo.com
- Click Enroll seat
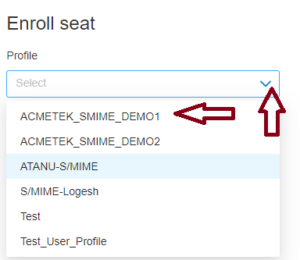
- From the Enroll seat window, click the Profile drop-down menu and select S/MIME
- RFC822 name (email): user1@digicertdemo.com
- Email: user1@digicertdemo.com
- Scroll to the bottom and click Enroll
- An email has been sent popup window will appear, copy the enrolment code by clicking the copy icon
- Minimize Chrome
- Open Outlook
- Draft a New Email and provide the following:
- To…: user1@digicertdemo.com
- Cc…: <leave blank>
- Subject: S/MIME certificate
- Body: Paste the enrollment code
- Click Send
- Close Outlook
- Restore Chrome
- Click Ok
- Repeat Steps 4 – 17 for user2
- Close Chrome
- Sign out of windows
Task: Pick up the certificate and install it
VM: User Workstation
Username: Accounts ID
Password: Accounts PW
- From the Server login screen, log onto the server using the user1 / Your Password credentials
- Launch Outlook
- Click on the email with the subject: S/MIME certificate
- Copy the enrollment code
- Click on the email with the subject: Certificate enrollment confirmation
- In the body of the email, locate and click the link
- From the Authenticate enrollment window, perform the following:
- Seat ID: user1@digicertdemo.com
- Enrollment code: <Paste your enrollment code>
- Click Next
- From the Verify enrollment window, click Next
- From the Verify certificate information window, click Next
- From the Install your certificate window, click the copy icon next to the password
- Minimize Chrome
- Launch Notepad
- Paste the password
- Save this file as txt
- Minimize Notepad
- Restore Chrome
- From the Install your certificate window, click the Download button
- Close Chrome
- Close Outlook
- Launch File Explorer
- Navigate to This PC > C: > Users > user1 > Downloads
- Double click p12 (This may be Certificate_pkcs12 (1).p12 if you didn’t delete your certificate from a previous lab)
- From the Welcome to the Certificate Import Wizard window, choose Current User, then click Next
- From the File to Import window, click Next
- From the Private key protection window, under password, paste the password
- Click Next
- From the Certificate Store window, select Automatically select the certificate store based on the type of certificate, then click Next
- From the Completing the Certificate Import Wizard window, click Finish
- From the Certificate Import Wizard window, click OK
- Close File Explorer
- Close Notepad
- Sign out of windows
- Repeat steps 1 – 33 for user2
Exercise 2. Configure Outlook for S/MIME
Now that we have a S/MIME certificate, we need to configure Outlook to use it.
The steps that will be performed in this phase are: Task: Configure Outlook for S/MIME
Task: Send an encrypted email
Task: Configure Outlook for S/MIME
VM: User Workstation
Username: Accounts ID
Password: Accounts PW
- From the Server login screen, login using the user1 / Your Password credentials
- Launch Outlook
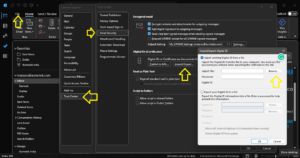
- From the Outlook Home menu, click File
- From the Outlook File menu, click Options
- From the Outlook Options menu, click Trust Center
- From the Outlook Options window, on the right side, click Trust Center Settings…
- From the Trust Center window, click Email Security
- From the Trust Center window, on the right side, under Encrypted email, check the boxes for Encrypt contents and attachments for outgoing messages and Add digital signature to outgoing messages
- Under Digital IDs (Certificates), click Import/Export…
- From the Import/Export Digital ID window, click the Browse… button next to Import File
- From the Locate Security Profile window, navigate to This PC > Local Disk (C: ) > Users > user1 > Downloads and locate the p12 file, then click on it to select it, and click Open
- Launch Notepad and open the txt file
- Copy the password
- Minimize Notepad
- Paste the password into the Password field
- Click OK
- The Importing a new private exchange key window will appear, click OK
- Click OK to close Trust Center
- Click OK to close Outlook Options
- Draft a New Email and perform the following:
- To…: user2@digicertdemo.com
- Cc…: <leave blank>
- Subject: S/MIME Test
- Body: Unencrypted message
- Click Send
- The Encryption Problems window will appear because we have not exchanged keys with this user yet. Click Send Unencrypted
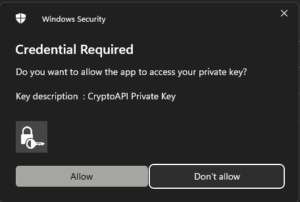
- A Windows Security window will appear, click Allow
- Close Outlook
- Sign out of windows
- Repeat Steps 1 – 19 for user2
Task: Send an encrypted email
VM: User Workstation
Username: Accounts ID
Password: Accounts PW
- Reply to user1’s email and perform the following:
- To…: user1@digicertdemo.com
- Cc…: <leave blank>
- Subject: S/MIME Test
- Body: Encrypted message
- Click Send
- A Windows Security window will appear, click Allow
- Take note of the icons next to the sender’s name:
The paperclip signifies that there is an attachment and the red award signifies that there is a signature attached to the email
- Close Outlook
- Sign out of windows
- From the Server login screen, login using the user1 / Your Password credentials
- Launch Outlook
- Locate the reply from the user2 and take note of the icons next to the sender’s name:
The gold lock signifies that the email is encrypted
