 Like the majority of server systems you will install your SSL certificate on the same server where your Certificate Signing Request (CSR) was created. Your private key will always be left on the server system where the CSR was originally created. Your SSL certificate will not work without this private key file. We will assume that this is the original system.
With Pulse Secure you will need to complete the pending request that was left on the system from when you created your CSR. Your certificate authority should have given you an Apache format or Other x509 type of SSL Certificate and Intermediate CA.
To install your SSL Certificate into Pulse Secure perform the following.
Step 1: Downloading your SSL Certificate & its Intermediate CA certificate:
- If you had the option of server type during enrollment and selected Apache or Other you will receive a x509/.cer/.crt/.pem version of your certificate within the email. Alternately you can access your Certificate User Portal by the supplied link in the email to pick up the x509 version of your certificate.
- Copy the SSL certificate and make sure to copy the —–BEGIN CERTIFICATE—– and —–END CERTIFICATE—– header and footer. Ensure there are no white spaces, extra line breaks or additional characters.
- Use a plain text editor such as Notepad, paste the content of the certificate and save it with extension .crt
- If your intermediate CA certificate for your product is not in the body of the email you can access your Intermediate CA also in a link within that email. Copy and paste the contents of your Intermediate CA into its own Notepad file and save it with a .crt extension also.
Step 2: Importing your Signed SSL Certificate:
- In the admin console, choose System > Configuration > Certificates > Device Certificates.
- Under Certificate Signing Requests, click the Pending CSR link that corresponds to the signed certificate that you are importing.

- Under Import signed certificate, click Choose File to navigate and select the location of your new SSL Certificate file.
- Click Import.

Congrats you have imported your SSL Certificate.
Step 3: Import the Intermediate CA Certificate:
Intermediate CA certificates are responsible for helping the chain of trust to all the different browsers that connect to the SSL Certificate and various roots. If your SSL Certificate is trusted on one browser but not the other more than likely it is due to a lack of Intermediate Certificates.
- In the admin console, choose System > Configuration > Certificates > Device Certificates.
- Click Intermediate CAs.

- Click Import CA certificate.
- Click Browse to specify the location and path of your Intermediate CA file.
- Click Import Certificate.
Congrats you have imported your Intermediate CA.
Note: Some Certificate Authorities may give you more than one intermediate. Repeat Step 3: Import the Intermediate CA Certificate to import any additional intermediates.
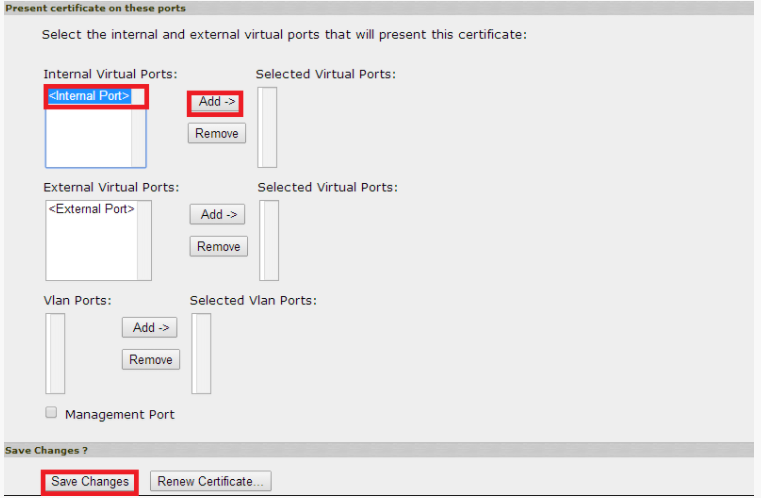
Step 4 Assigning your SSL Certificate to your Virtual Ports:
- From the device certificate list, double click on the certificate you are replacing.
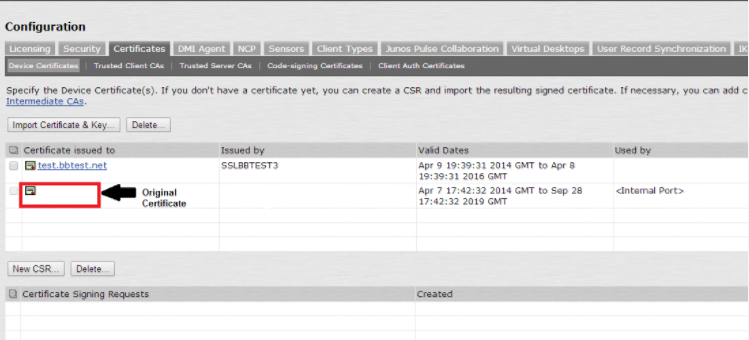
- Under the present certificate on these ports remove/unbind the certificate from any ports that it is applied to.
- Click Save Changes.

- Now with the old certificate unbound to the relevant port double click on your new SSL Certificate.
- Select the and Add the relevant ports that you used the old certificate on to the new one.
- Click Save Changes.
Congrats you have configured your Pulse Secure system with your new SSL Certificate.
If you are unable to use these instructions for your server, Acmetek recommends that you contact either the vendor of your software or the organization that supports it.
Pulse Secure Support:
For more information refer to Pulse Secure.