Microsoft Exchange Server 2010 SP3 helps IT Professionals achieve new levels of reliability with greater flexibility, enhanced user experiences, and increased protection for business communications.
- Flexible and reliable – Exchange Server 2010 SP3 gives you the flexibility to tailor your deployment based on your company’s unique needs and a simplified way to keep e-mail continuously available for your users.
- Anywhere access – Exchange Server 2010 SP3 helps your users get more done by giving them the freedom to securely access all their communications – e-mail, voice mail, instant messaging, and more – from virtually any platform, Web browser, or device.
- Protection and compliance – Exchange Server 2010 SP3 delivers integrated information loss prevention, and compliance tools aimed at helping you simplify the process of protecting your company’s communications and meeting regulatory requirements.
In this article, we will go through the process of
- Microsoft Exchange Server 2010 SSL Installation
- Exporting to your ISA Server
- Installing with the Command Line Interface
1.SSL INSTALLATION:
- Download and open the ZIP file containing your certificate. Your certificate file will be named as your_domain_name.cer.
- Copy the your_domain_name.cer file to your Exchange server.
- Start the Exchange Management Console by going to Start > Programs > Microsoft Exchange 2010 > Exchange Management Console.
- Click the link to “Manage Databases”, and then go to “Server configuration”.
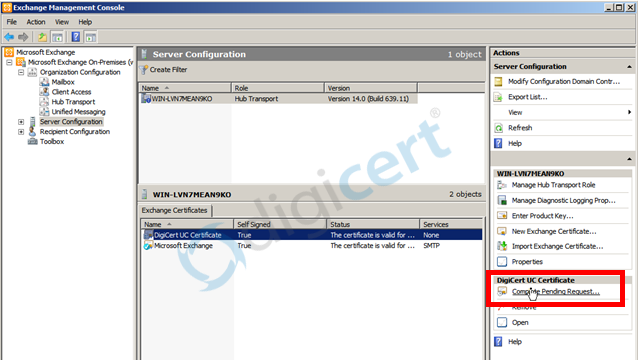
- Select your certificate from the menu in the center of the screen (listed by its Friendly Name), and then click the link in the Actions menu to “Complete Pending Request”.
- Browse to your certificate file, then click Open > Complete.
Frequently Exchange 2010 will show an error message stating that “The source data is corrupted or not properly Base64 encoded.” Ignore that error.
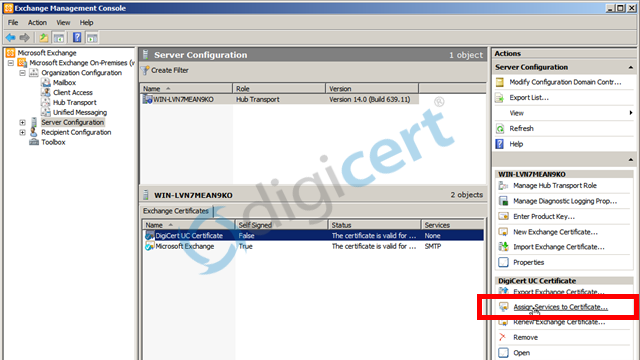
Note: Hit F5 to refresh the certificate and verify that it now says “False” under “Self Signed”. If it still shows “True”, you may have selected the wrong certificate or you may have generated the request on a different server. To fix this, you can create a new CSR on this Exchange server and reissue the certificate. - Now, to enable your certificate for use, go back to the Exchange Management Console and click the link to “Assign Services to Certificate.”
- Select your server from the provided list, then click Next button.
- Select the services for which you would like to enable your new certificate, click Next > Assign > Finish.
Your certificate should now be Installed and Enabled for use with Exchange.
2.Exporting to your ISA Server
When exporting your certificate, make sure to include all certificates in the certification chain, when prompted. Otherwise, your certificate will not work properly.
If you are currently using an ISA (Internet Security and Acceleration) server in front of your Exchange 2010 server, or need to export your SSL certificate to any other Microsoft server type, see our Exchange export instructions for a step-by-step walkthrough.
For assistance getting your certificate installed or fixing an SSL installation issue, check out our new Windows SSL manager.
3. Installing with the Command Line Interface
If you prefer to install your certificate using the Exchange Powershell, you can run the following command:
Import-ExchangeCertificate -FileData ([Byte[]]$(Get-Content -Path c:\your_domain_name.p7b -Encoding byte -ReadCount 0)) | Enable-ExchangeCertificate -Services “IIS,POP,IMAP,SMTP”.
Note: Only the desired services are specified by the Enable-Exchange Certificate portion of the command
If you are unable to use these instructions for your server, Acmetek recommends that you contact either the vendor of your software or the organization that supports it.

